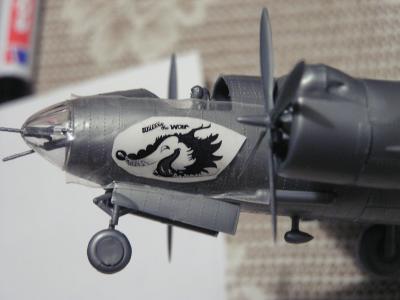
Willie the Wolf
2005-01-15 Project start

This project really started when
Art Kramer's stories
about his wartime experiences
with this aircraft captured my imagination about a year and a half ago. Since then,
the idea to build a model of this plane has been lurking in the background, waiting
for the required techniques to come together. I initially bought the supposedly new
Revell Marauder kit, but this turns out to be a very old monstrousity I'd rather not
describe an any more detail. I threw that particular kit together in a few hours,
for use in checking the size of the decals once I got around to doing those. I then
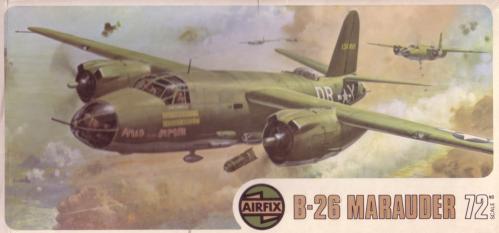
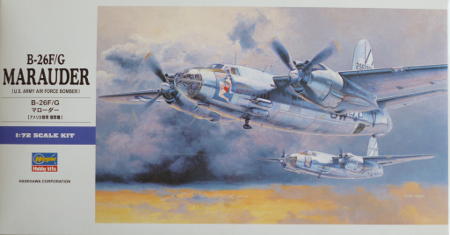
bought another kit, the Airfix one of which the box is shown. Despite the stigma
attached to this brand in some circles, I think this is the best Marauder kit around,
and although it will no doubt put up considerable resistance, I think it should turn
into a very nice model. I also bought the Edward photo etch detail set, an a set of
vacform canopies. Of course, none of that is going to do me any good without decals.
The project then went on hold until I found the confidence in
my skills (or arrogance, if you prefer) to believe I can pull off a custom decal
sheet for this aircraft. Some tinkering based on pictures on Art's website has now
produced an initial result for the most prominent part of the markings, as shown below.
I also put a small, black and white print on normal paper on the Revell monster, to
get the size. I think this should be about right.
I've sent an email off to Art, to ask for his take on the results so far. I'm now
eagerly awaiting some feedback.
2005-08-23
Art did reply, and quite promptly too, but this was about the time when all hobby
activity that didn't have some sort of deadline got suspended while I went through
the procedures of buying a new home. I was happy to hear that Art liked what he saw
so far though. Despite this, and to my embarassment, this project was stalled
until my current wave of cathing up arrived.
Even so, there will perforce have to be some silence on this project for a while yet,
while I experiment further with the printing process. Getting the grey areas right is
going to be interesting, but hopefully the new ribbons I got for the ALPS will help.
Reboot
2015-10-20
For a decade, Willie was near the top of the list of things to build, but somehow, it never
happened. There was some related activity, though, and effectively, the project ended up
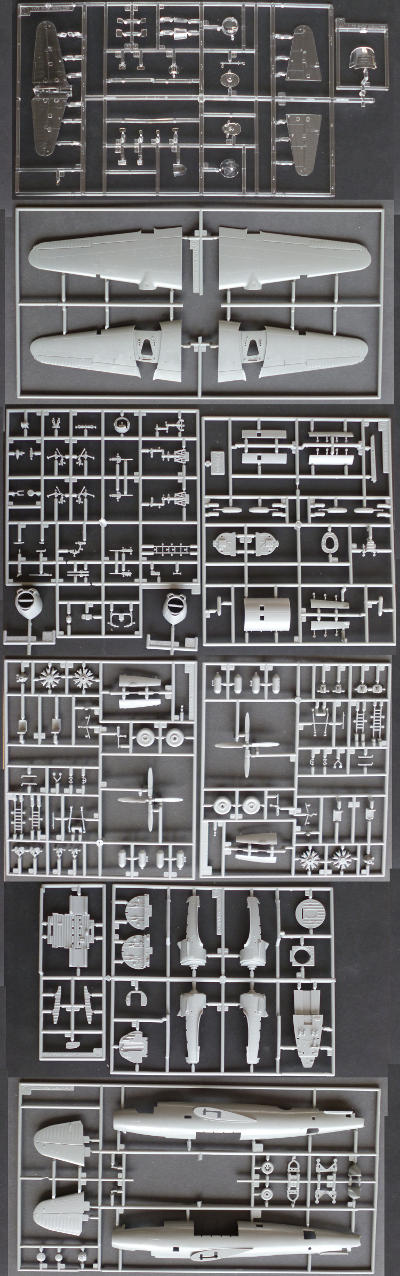
restarting practically from scratch. First of all, Hasegawa came out with a family of Marauders.
The Airfix kit is a beauty, no doubt about it, and I don't think I would have replaced it
for quality issues, but Hasegawa's offerings included the correct variant, which of course
helps a lot in getting things right. This immediately made the after market parts associated
with the Airfix kit obsolete as well, but there's always more to splurge on. The initial crop
included CMK engines and bombay. I'm not really sure they'll add a lot, as the Hasegawa is
already very nice. I'll take a stab at the engines for sure, but I have my doubts about the
bombay; it doesn't look like it will improve the kit parts much, and I'm considering using
those, and transferring this set to the Airfix kit, which I still intend to build at some
point.
At this point, there was again a long pause, until I finally decided to stop letting other kits
jump the queue and get started on Willie. In the mean time, several other interesting looking
sets came out for the Hasegawa family. Most interesting of these is an undercarriage set by SAC.
I can't say I'm overly fond of that particular line, since they just seem to be selling direct copies
of kit parts in a different medium, but in this particular case, that's just what I need.
Marauders are notorious tail sitters, with little room anywhere to add weight in the nose, so
a nice big lump of metal to replace the forward wheel well and cockpit floor plate may well
be just the thing. I also ordered some weighted wheels and machine gun bits, and I'm now waiting
for the mail to do it's thing.
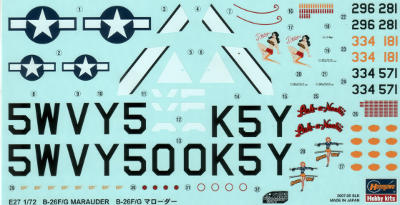
The decals were finished long ago, in early 2010 as near as I can recall, so I should be good to
go in that respect. I have some doubts regarding the correct identification codes for Willie;
going from the fotos, I'd swear the code is K9D, but Art says K9J. I'll be going with K9J,
because at the end of the day, I'm building Art's Willie, not the USAAF's.
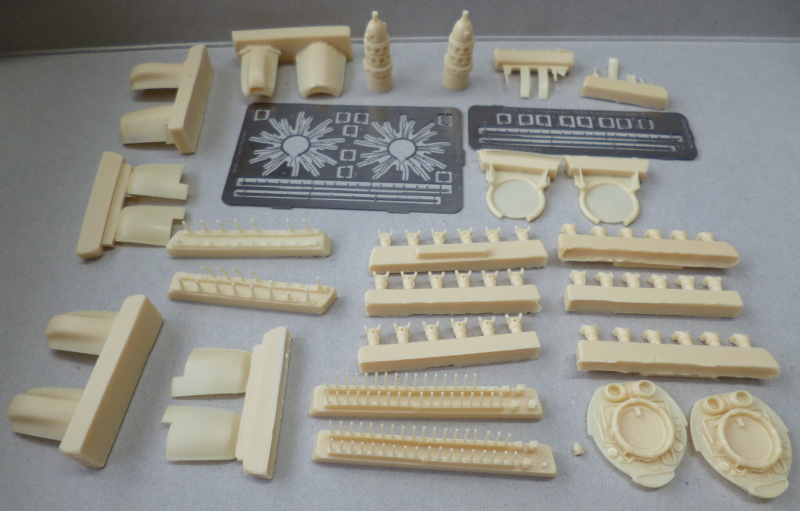
The pile of parts in the picture below should in theory become a pair of engines and engine covers:
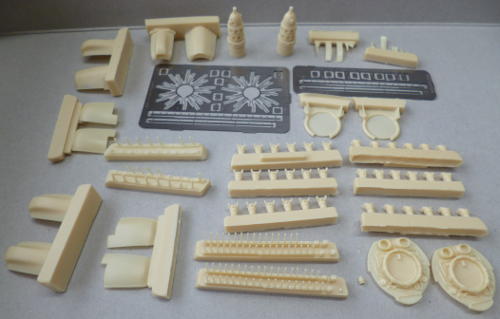
I'm not entirely convinced by all this resin and etch. For one thing, there are a huge number
of very fragile resin bits of tubing in there, and some of them were already missing when the
parts arrived (or at least when I first opened the blister). Even despite the number that was
supposed to be there, the instructions insist you make even more of them from 0.8mm brass rod.
No idea why they included some in resin, and left out the others. The instructions are also
maddeningly vague as to what goes where and how to bend the various etched parts. We'll see
how far I get with this. Even a partial build of these engines should be better than the kit
parts, so I don't have all that much to lose. It will only become risky when I get to the point
where I need to modify the kit parts to join up with the resin; if I mess up there, or manage
to turn the multi-part covers into a hash after that, I'll have irrecoverable engine nacelles.
I've made a modest start by sawing the engine cores off the pouring blocks. Since resin dust
is nasty, this involved cramming the trench along which they need to be cut with vaseline before
sawing, and cleanup afterwards.
2015-10-23
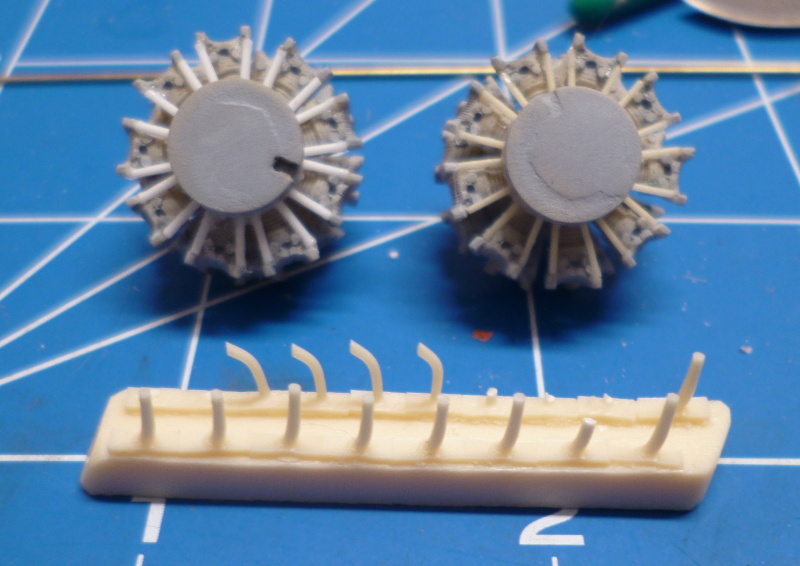
I just mounted the first 18 cylinder heads on the two engines. Yes, they're a bit more detailed
than the kit parts, but even so, I'm not overly impressed. The heads are supposed to fit into
holes in the engine core, but not two heads and no two holes are the same size or dimensions.
Not that the latter matters very much, since all heads are larger than all holes, so instead of
fitting in, they ride on top of the holes. I'll check the resulting dimensions tomorrow; if they
don't match those of the kit parts, I know where the resin is going to end up...
2015-10-25
The forward ring of cylinders was a bit more cooperative, and it's starting to look like engines.
Only about 100 more parts to go for the pair...
2015-10-27
Wheee! The mail just delivered a whole pile of extra Marauder bits.
Especially important is the SAC set with the huge metal cockpit bottom. This will enable me to
start work on the main bulk of the plane, and take the engines in small doses. Now, if only the
coming weekend wasn't booked wall to wall with other stuff...
2015-10-30
I started the day by attempting to attach another cylinder bit. No dice; just when I had it
worked down to a precise fit, it went 'ping' and launched itself into the great blue yonder,
never to be seen again. I'm building up a real nasty hatred for those parts..
So, not to ruin my mojo completely, I switched over to bombays. The Hasegawa parts are
adequately detailed, and perfectly engineered. This thing just falls together.
I'm thoroughly impressed.
The CMK parts on the other hand, are incredibly detailed, leaving the Hasegawa bits in the dust.
But, and this is a big one, the engineering falls way below this standard. Fit is not too great,
lining up the parts is fully expected to be a nightmare. Worse, in order to fit the parts to the
fuselage, I'll have to remove most of the interior detail on the Hasegawa parts, and mess with
the alignment holes and tabs. That leaves me a tough call to make: settle for the adequate kit
parts, or risk the kit by trying to install the resin parts, hoping to fix the fit issues well
enough that my hamfisted fixes don't ruin the effect of all that lovely detail. If I go down the
latter path, and mess up, I'll be shopping for a new Marauder kit. Decisions, decisions...
2015-10-30
I found the 'wing spar' opening could be modified without impairing the fit of the kit parts,
and having done so, found I could get the rear bulkhead to play nice with the corresponding
alignment tabs. The front bulkhead will be more difficult, but I think I'll be able to persuade
it. I think these parts will make it into the final product. The side panels look set to put up
much more resistance, mainly because the shape doesn't quite match that of the roof. I might end
up putting the kit inserts into the resin bomb bay.
The picture is not a dry fit; there is PU glue on the join between the roof and the bulkhead.
I don't think the resulting bond will be overly strong, but it should be enough to keep the parts
together while I deal with the front bulkhead. The downside of this is that the glue is quite slow,
and that means the fuselage and bomb bay are out of the game for 24 hours.
2015-11-08
I spent most of today fiddling and twiddling the various sub-assemblies that will be enclosed
inside the fuselage, but have little to show for it. The bomb bay is now fixed inside the right
half of the fuselage, along with supports for the dorsal turret. The bulkhead just aft of that
decided it would rather stick to the left half, despite the fact that I'd run cement into the
right side - capillary action drew most of it uphill into the wrong half, effectively closing
up the fuselage way before it's time. Let's say I managed to separate the halves, and not go
into the details :evil:
The bomb bay took some force, but I've managed to get it permanently into position, and can now
start the work on getting it to connect seamlessly to the fuselage. This will take a bit of filler.
I (partly) assembled the pilot's chair from the Edward etched set. An enormous improvement over
the kit part, but Edward seems to think I can somehow connect the seat to the top of a pyramid
without messing up. I disagree :sad: Instead of the etched legs, the chair will have to sit on
the lumpy stubs from the kit. This results in the cockpit mockup seen here. Sadly, this
immediately revealed the seats were much too low relative to the rest of the cockpit (per
implication, the kit parts were also too low). The SAC part is not to blame for this; it may
not add one whit of extra detail, but it is a faithful copy of the kit part. I'll have to build
up the stubs by about 3mm to get things to look a bit more reasonable.
I also put in some more work on the engines, and finally completed attaching the cylinder rods.
On the front side, that is, there's another 36 on the rear. Entirely too many on the CMK 'parts'
(the don't really deserve the name, they're more like scratch building supplies) broke or jumped
off into the jaws of the carpet monster, so at least one of the engines will have to accept
replacement bits from Evergreen rod.
One of the bits sticking out of the front of the engines also departed at high speed, and had
to be replaced with a scratched part: carefully stretched sprue squared off for about 1mm.
2015-12-18
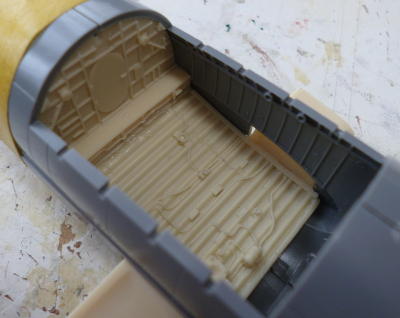
I finally found some serious building time again, so it's back to the Marauder for me.
The kit has nothing inside the space where the navigator and radio operator worked. Arguably
this is irrelevant, as it would be all but invisible on the finished model, but since it was
the stories of the bombardier-navigator that got this build running in the first place,
unacceptable in this case. Time for some assisted scratchbuilding.
I put in a decent floor, and the rear side of the bulkhead separating cockpit and BN station.
This bulkhead is now ridiculously thick, but given what the kit supplied (more precisely, the
identically shaped SAC replacement), the best I could do. The interior of this space will come
from the photo etch set, which was aimed at the Airfix, and thus contains a nice collection of
interior details.
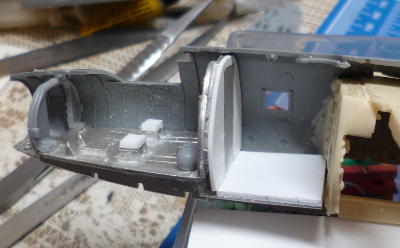
The cockpit module is now permanently (but for now rather weakly) attached to the right half
of the fuselage. I hope this will make it easier to build the interior correctly the first time,
rather than finding out during final fitting that things have gone out of alignment. It would
have been better if I'd remembered to remove those ugly ejector marks from the BN station, and
to open up the mounting holes for the gun packs, before fitting, but that would have made my
life too easy..
2015-12-21
The large parts of the interior are now attached properly to the right half of the fuselage,
and have been given a shot of primer prior to airbrushing with interior green; this is now
drying in the shed (rattlecan stinks, so I prefer to leave it outside until most of the vapours
have gone). I've also started folding the little black boxes that need to go in. I'll have to
be very careful not to get mixed up there, the boxes are slightly different, but the drawings
are not sufficient to determine which is which; some careful tracking required..
I don't have enough photo etched chairs to give all the crew proper ones, so the navigator and
radio operator will have to make do with the kit parts that were intended for the pilots,
although I'll embellish them a bit with scratch built legs and armrests; I've just bought a
hole pile of aluminium junk food trays for just this purpose, which should provide me with a
lifetime supply of stiff metal sheets for scratchbuilding.
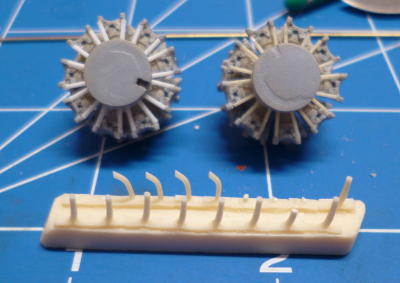
Meanwhile, there's also been a bit of progress on the engines. The rear 36 rods, 18 originals,
and 18 replacements, have been installed.
 The pouring block in front of the engines is the least damaged of the pair that is supposed to
supply me with 32 of a total of 70 inlet and exhaust tubes for the engines. In their wisdom,
CMK decided they didn't even need to try to include the rest, and that people buying resin
engines really meant they wanted to scratchbuild the engines in the first place
The pouring block in front of the engines is the least damaged of the pair that is supposed to
supply me with 32 of a total of 70 inlet and exhaust tubes for the engines. In their wisdom,
CMK decided they didn't even need to try to include the rest, and that people buying resin
engines really meant they wanted to scratchbuild the engines in the first place
As it stands, I expect to be able to use at most 4 of the tubes (parts 1 and 4); most of the
rest are lost or broken, and even those that are still around are the wrong shape, and thus
useless. Also note that for some reason CMK believe two round pipes can be fitted into a single
round hole which is just slightly larger than one of the tubes. Their engineering genius is far
beyond mere mortals like me..
I've made up the first of what will need to become 18 part 20 replacements, each of which will
have to be individually fitted in place, since the cylinders are not perfectly attached (my bad),
and so each tube will be a slightly different length and will have to take a slightly different
path around the other cylinders. This is going to take a while...
And then at the end of the process we get to the all important question: will it join up with
the engine/undercarriage pods. If not, this will all have been for nothing, and I'll have to
find another kit to supply me with replacement pods. Take my word for it that I'm by now very
motivated not to mess up that particular part of the process..

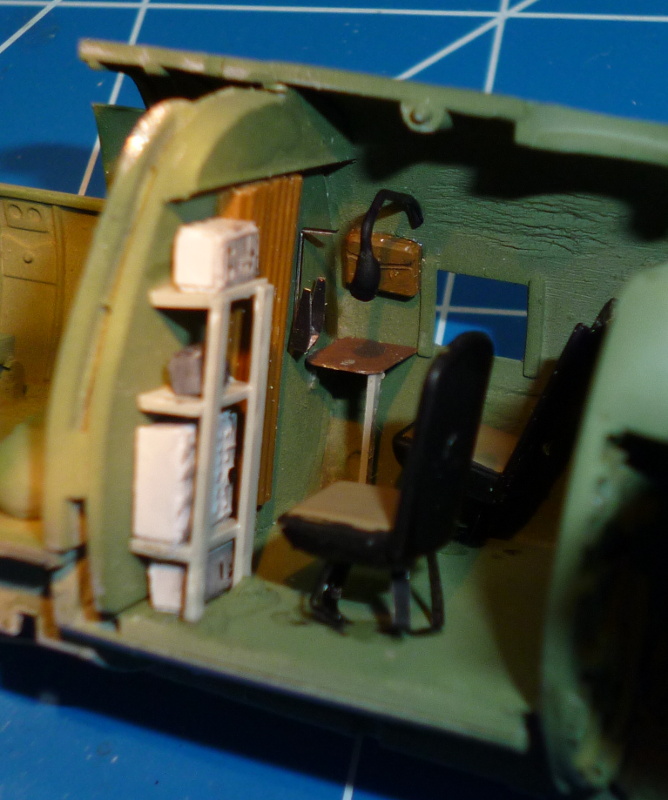
2015-12-24
The scratchbuilt room is coming along nicely. I'll have to do something about the top of the
curtain/folding door between this room and the cockpit, but that should be sortable, as should
a bit of touch-up on the discolourations caused by glue.
20160131
I finally managed to get in some bench time for this project, and complete the rear office.
I'd originally planned to put a scaled down map on the plotting table, but that would have been
no more than a pale chip of paper in this scale. Better to leave well enough alone.
Now, on to the other interior areas..