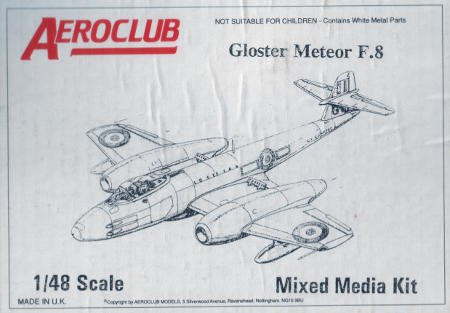
Aeroclub Meteor salvage
2014-01-13 Project start
This year's IPMS New Year's event at Flash Aviation was
a good place for scavengers like myself who were willing to save damaged kits from the landfill; in
addition to this kit, I got my grubby paws on
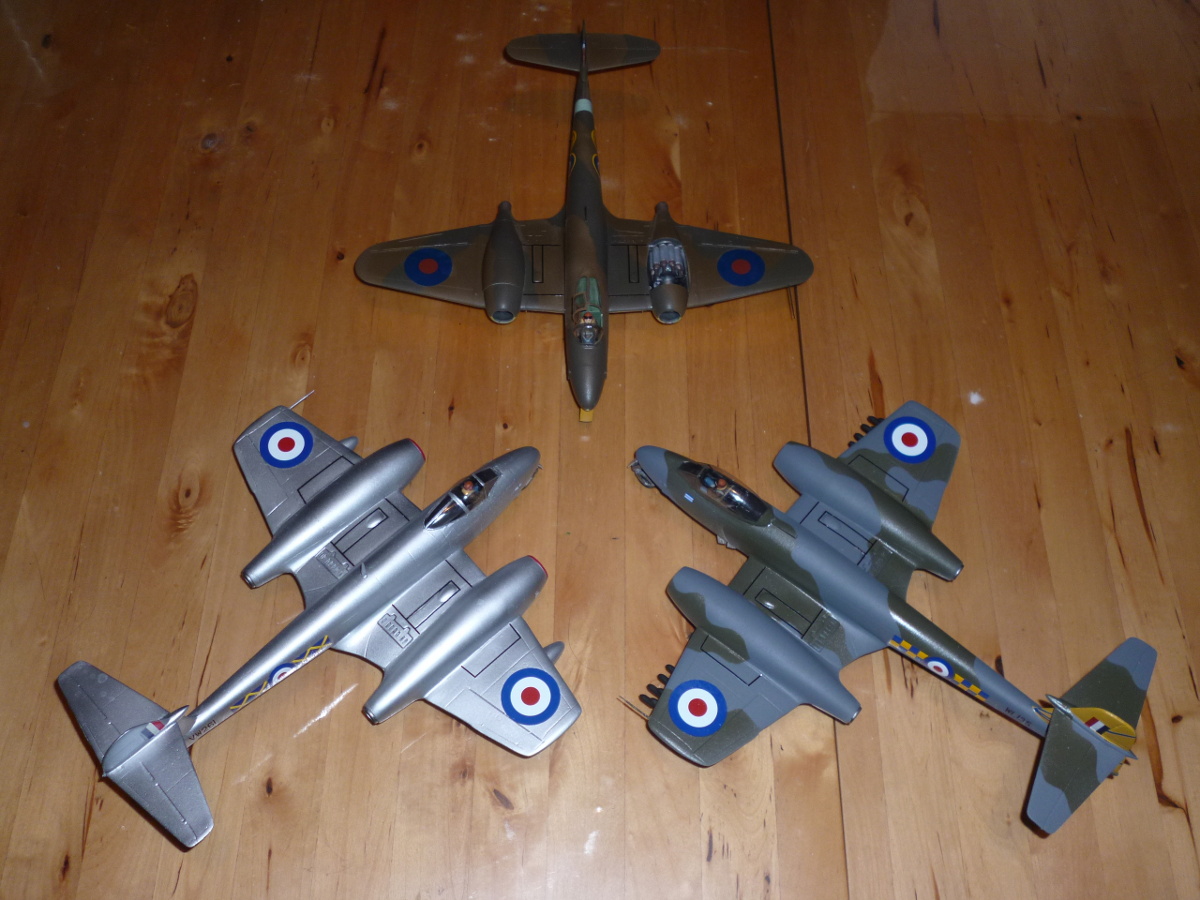
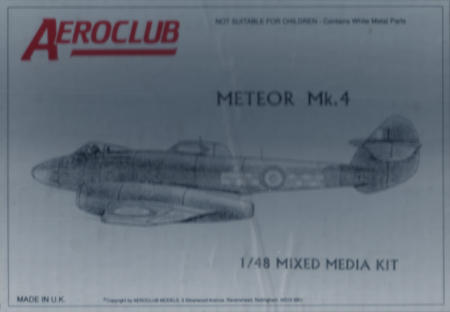
a pair of Aeroclub Meteors. Actually, two slightly different boxes of Meteor parts. There's enough
parts for about a plane and a half, and those parts were more of less randomly distributed between
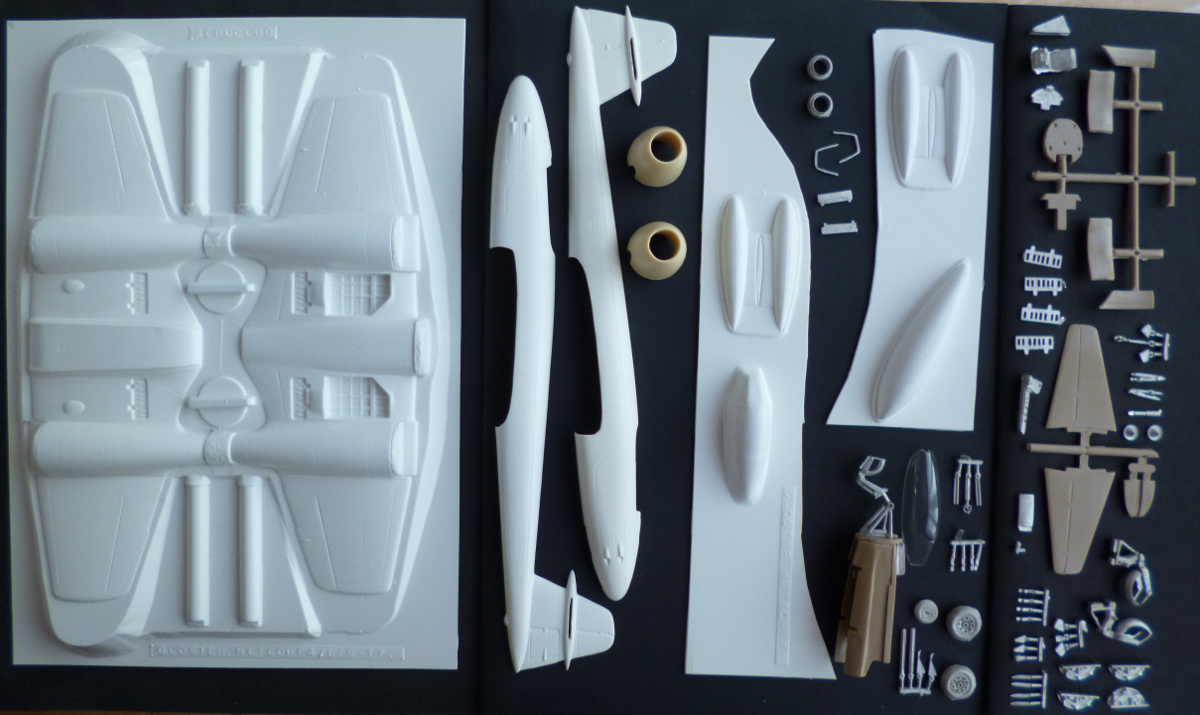
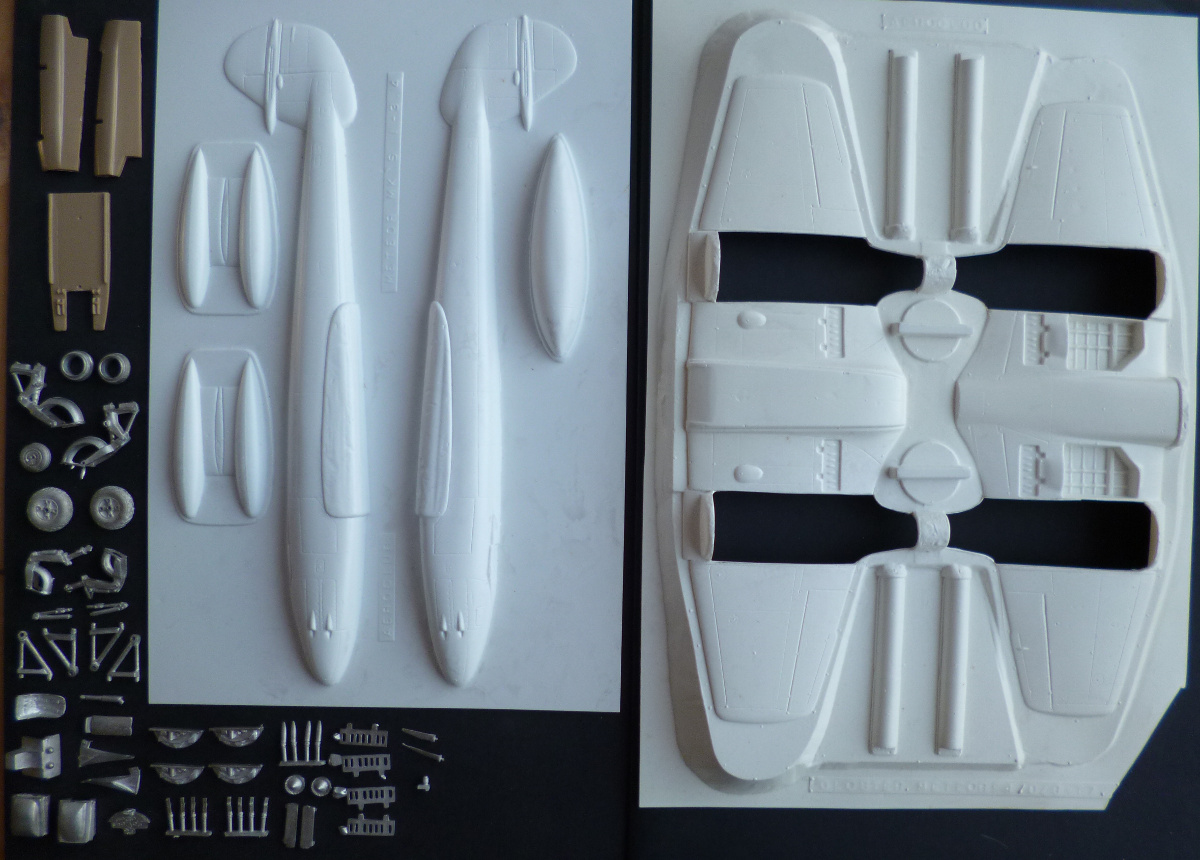
the boxes. First order of business then, was to sort them out and take stock. I think I have enough
parts for the complete F8, while the Mk4 has some serious shortages; minor things really, after all,
who needs engines and vertical stabilisors anyway.
Conventional wisdom would suggest building the F8 and forgetting about the excess parts, but instead
of either conventional or wise, I tend to be over ambitious, so I'm going to try to squeeze both
models out of this. I should be able to copy the missing bits for the Mk4 from the F8, with the
exception of the cockpit canopy. Fortunately, a vacform canopy is available as an aftermarket part,
intended for the Tamiya kit of the same subject. I'll probably end up spending more on materials
to complete the Mk4 than the Tamiya kit would cost me, or even a pair of them, but hey, if you're
going to do something daft, you might as well go all the way. Oh, did I mention I've never built
a vacform before either?
2014-05-27
I've cast replacement vertical stabilisors in resin for the Mk4. They are quite thin, but making
the mould turned out to be fairly easy. The resin is positively eager to get into every little
corner of whatever mould you pour it into. Actually curing can be another matter though; mix
very carefully, or deal with sticky, half cured goo. My biggest worry in this project is how to
replace the engine pods, or perhaps even the entire wing. If I can find a way to pull that off,
I should be able to get this to work.
2015-03-29
This project and I have been circling each other for a year, and with
this GB on the agenda,
I decided to finally get serious about it. I've bought some decals for these planes, and have
the canopy on order; it should arrive in time to be useful, if not, I have a plan B (and some
bits further down the alphabet..) I've also produced copies of the vertical stabilisers in cast
resin. Other than that, the status is as seen in the pictures.
I have a serious load of silicone rubber in stock, and what will hopefully turn out to be a properly
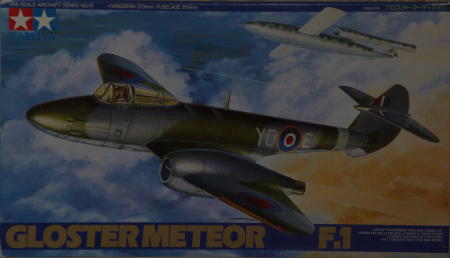
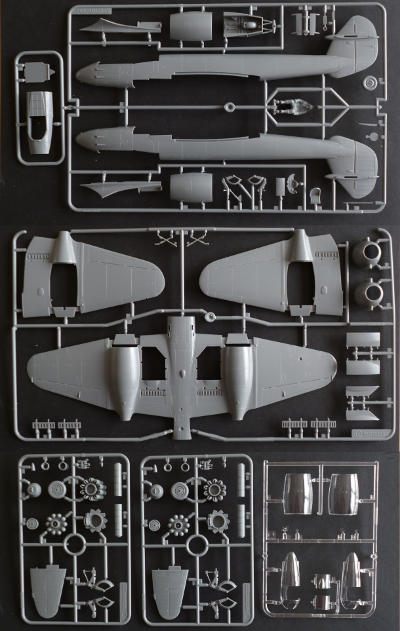
cunning plan to fix the wings. I've also obtained a Tamiya Meteor Mk1, to help visualise what the
completed machines should look like, and if necessary provide further parts for duplication. I hope
not to have to make much use of it; if all goes well, I'll only use the pilot figure from it as a
master. It is also an alternative source for a replacement canopy, as it contains two slightly
different variants.
First order of business on this project is clearly going to be replacement of the missing engine
nacelles. Succes or failure there deternines whether this project will produce one or two models,
so instead of starting the build by building the interior, or by freeing the parts from the sheets,
I'll be starting out with Lego and clay, rubber and resin.
2015-04-03
The Squadron canopy just arrived. All set and rearing to go..
2015-04-03
Not quite, apparently.. Paranoia is such a useful trait at times..
I won't be able to do much work on this tomorrow, and all the useful shops will be closed
for two days after that because of Easter. I didn't really have a good idea how much plasticine
clay would be needed to build a dam around those Meteor wings, so just to be safe I started building
my tools a few hours early. As I'd feared, there's just no way to build a sufficiently high and long
dam with the clay I've got. Urgent shopping scheduled for tomorrow, to avoid blockage later.
2015-04-05
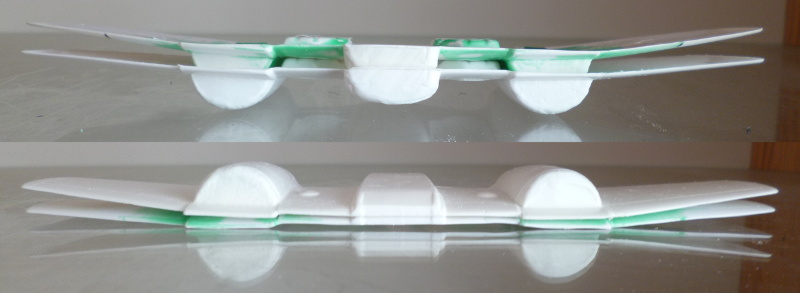
I'v dammed in the wings as much as my original supply of clay would allow. This is not because I'm being
stingy, but because I find that whenever I work on one part of the dam, some other part comes loose. I've
pressed down the edges of the current affair, and will be builing it up further as needed when part of
the rubber has been poured. Hopefully the rubber will help stabilise things that way.
After 450 grams of rubber, I'm still seeing engine nacelles. This is going to take a lot of rubber..
Fortunately, I anticipated that, and have 2 kilos of the stuff reserved for this part of the project (see
what I mean about the kit not being worth the price of materials used to salvage it...)
At this point the limits of the original dam have been reached, and I'll leave this for some time while the rubber sets.
The edges show some seepage, but I believe I've contained it well enough that most of the first layer of rubber should stay
where it belongs. I expect no trouble after that, since any escape paths will now have been sealed.
2015-04-05
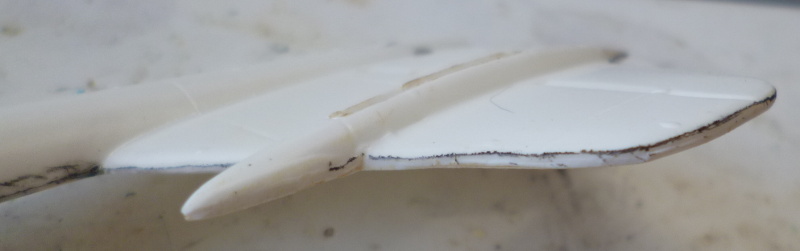
I did a more thoughrough inspection of the F8 fuselage, which had been cut out by a previous owner.
At first glance, it seemed he'd done a commendable job, but than it struck me that the tail was going
to end up being very thick. So, I looked closer, and it now seems that instead of cutting the parts
out parallel to the backing sheet, he went mostly perpendicular. If you looked really carefully, it
was possible to see where the part ended, and the extra sheet thickness started.
No chance now of marking out a proper inkline, or using the surrounding sheet as a guide for sanding
out the fuselage parts. I did notice, however, that when I ran my finger along the edge, in most places
I could actually feel the difference between part and cut as well. As anyone whose ever traced a relief
through a piece of paper laid on top of it will know, a pensil can pick out such barely detectable ridges.
On the off chance it might help, I ran the side of a pencil along the edge. To my pleasant suprise, it
showed the demarcation almost everywhere on the fuselage.
2015-04-05
I've attacked the fuselage halves with an arsenal of sanding tools, and I'm not unhappy with the result.
The halves still fit together, and the tail, although not yet perfect, is certainly workable now. Squeezed
shut while glueing, and then worked down to size from the outside, it should come to resemble a tail.
One of the cokpit tubs had been partially assembled by a previous owner, and my next step was to see if it
would fit the fuselage halves. No chance. I don't know if it used to fit, although I doubt it, but certainly
with the fuselage reduced in width as it is now, the cockpit module was far too wide. Cue sanding, filing
and bad language. I've worked it down to the point where I can almost squeeze the fuselage shut around it.
I'm afraid that's as far as I'll be able to go, as the front is now flush with the mounting holes for the
undercarriage. Maybe if that front gear hadn't been attached yet I might have had some options left, but
as it stands, I'll just have to fudge over this end.
I won't be doing anything about the wing restoration anymore today; the rubber needs to cure, and I'm not
going to rush this. Realistically, this means I'll only know how many Meteors I have a shot at on Tuesday,
when I hope to do the actual, nerve wrecking, resin cast directly into the mauled vacform wing. This will
slow down further Meteor work a bit until then.
2015-04-06
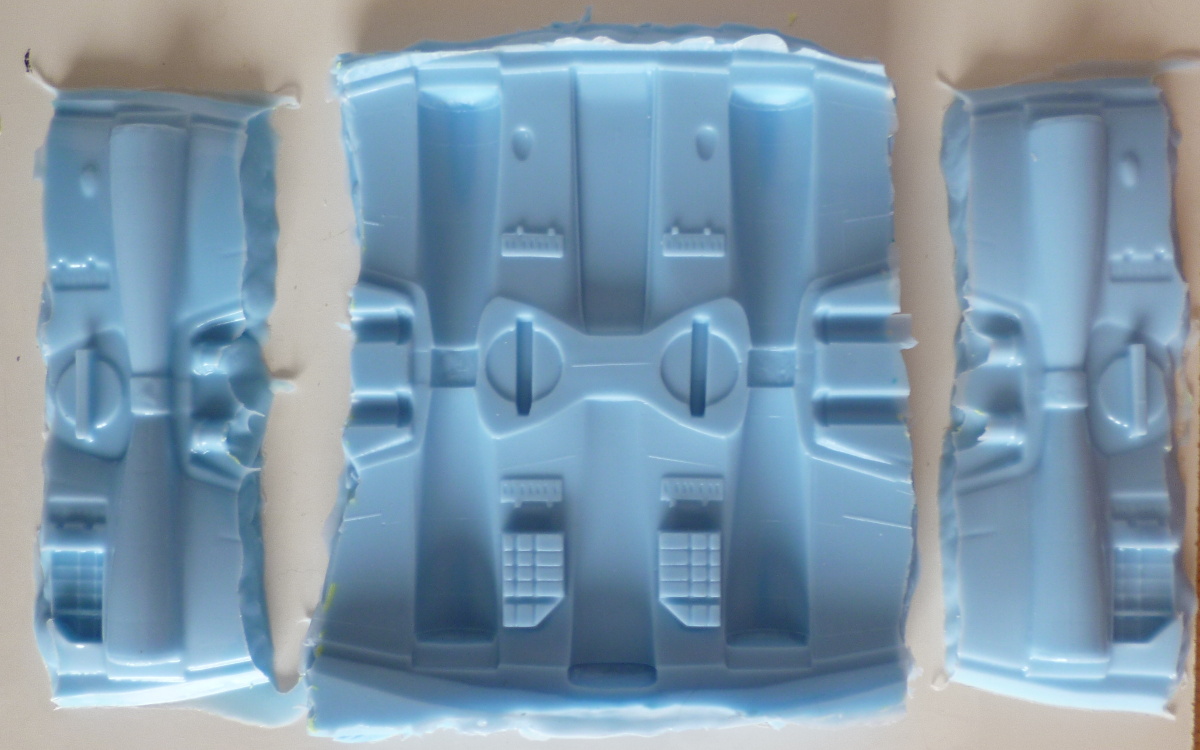
I've started the day by digging out 0.8kg of rubber from between the dams. All green so far...
More dams, more setting rubber... I've split the top into two halves, because I'm going to have to get the
top part into position rather quickly after pouring in the resin, and I think it will be easier to do
this with two halves than with the whole block. I only have so many hands to work with, and for all my
tricks I'm prone to fumbling at the wrong time, so if I can make life easier for myself, I will.
2015-04-07
The mould is now complete. I was still debating whether to just fill the bottom half and then plunge
the top half into it, or to cut up the mould to create a sprue, but the succesful test with the TU-128
cockpit convinced me to just go for the simple option. The mould is therefore ready for it's first and
only use. I wish my nerves were just as ready..
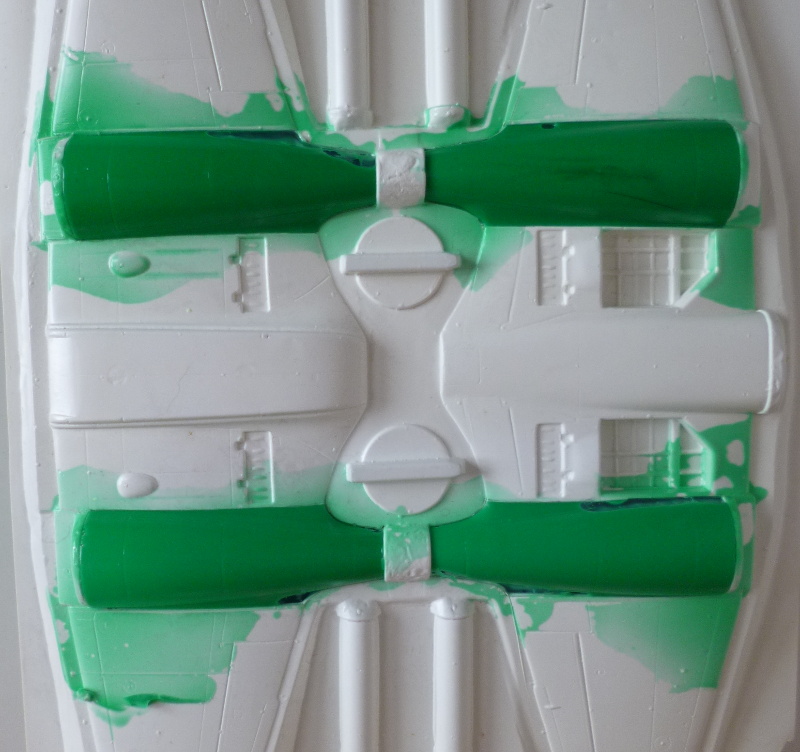
The first pair of engine halfs has been filled with resin. The spill-over observed is limited and ended
up in places where it can be ignored. I can only hope the much more relevant other side matches my expectations
as completely. The wait until I'm certain the resin is completely cured is likely to be some of the longest
hours I've experienced in a very long time...
2015-04-07
There's more seepage than I'd bargained for, but the spills are (with the exception of two small lumps)
so thin they look more like a thick coat of paint than a real problem. I think
that if I were to shoot primer over the lot to hide the colour difference, you'd have a real challenge
finding the edges of the spills.
In short, I'm one happy camper..
That is not to say there isn't room for some further improvement. With more resin getting out the backdoor
that I'd counted on, there was less resin than planned to actually do the work, and some gaps showed up.
But really, this is no problem; I've just proven it's possible to fill huge gaps in sheets of plastic using
large lumps of rubber and a bit of resin. Small gaps should be even simpler...
The second pass is currently curing..
As always with wild projects like this, there's the question of whether it's worth it, other than from the
taking on challences point of view. The cost of the resin is negligable (there's a total of six teaspoons
in there after the second pass..), and there's about 28 Euros worth of rubber involved. The challenge was
already worth it to me, but I can't help but wonder about the value of the kit so salvaged. There's a pair
of these on eBay at the moment for $100 each (!!) , but this seems excessive.
2015-04-07
I've just de-moulded the second pass. No further leaks, and the holes are mostly closed. What gaps remain
can be handled by more conventional means. I'll definitely be building two Meteors.
I'l leave the wings alone for now; full cure takes about a day, and I don't want to take any unnecessary
risks with this. Plenty of smaller parts to work on.
From here on, work on the F4 will take the lead, with the donor F8 trailing behind, to supply parts for
copying as and when needed. I'll certainly have to make a mould for the intake part of the nacelles, but
any other missing bits will be revealed as work progresses.
2015-04-08
As soon as I started sanding this morning, I started hearing creaking noises from the sheet, no doubt
the resin and the polystyrene beginning to separate. That just wouldn't do, so I put into effect the plan
I had for that situation. I cut narrow strips from some tissue paper, put them in position to reinforce
the connection, and dribbled thin CA over it. Soggy tissue paper being what it is, it enthousiastically
clung to the surface it was on, and there got fixed in place by the setting CA, hopefully creating a very
strong bond between paper, resin and plastic. It seems to work well, but with the amount CA out in the open,
it was an eyewatering experience.
I've since cut up the repaired sheet, and started work on liberating the wings from the backing. The resin
separated from the plastic around the exhausts while I was breaking off excess backing sheet, but this was
not unexpected, and in fact usefull; the previous owner had done a good job at cutting out the nacelles, so
the break was exactly where the part was supposed to end. An hour down the line, and about 40% of the
circumference of the lower half done, I needed a break from this supposedly therapeutic activity to avoid
needing some therapy for real..

2015-04-08
I've finished liberating the lower wing. I think one major component per day might be the maximum amount of sanding I can handle.
I'm certainly reaching the point where my frustration with/terror of vacforms is a thing of the past, but
I suspect they'll be limited to long term, semi-background projects until I reach the point where the main
parts have been excavated (which is a marked improvement over "must learn to beat these one day - but not today").
2015-04-08
The parts missing from the F4 include the wheel well doors, so I'll have to copy those. The ones that are included
with the F8 are, to be polite, less than subtle; at 2mm thickness for the main doors, I feel they're just a bit overbuilt.
I think the Tamiya is going to be doing some lending of parts for copying after all..
2015-04-10
I've completed sanding out the second half of the reconstructed wing. Fit, as I expected, is horrible. Rather a lot more
effort will go into that wing before it behaves...
2015-04-19
Slow going this past week. I've sanded out the lower half of the second wing, as well as the remaining jet
pipes, creating a small mountain of styrene dust in the process and not much else for now. Still, with all
the pipes now ready to roll, I can start doing some actual construction, and once the final wing half is
dug out, I might actually start to produce some visible progress, maybe next weekend.
2015-04-20
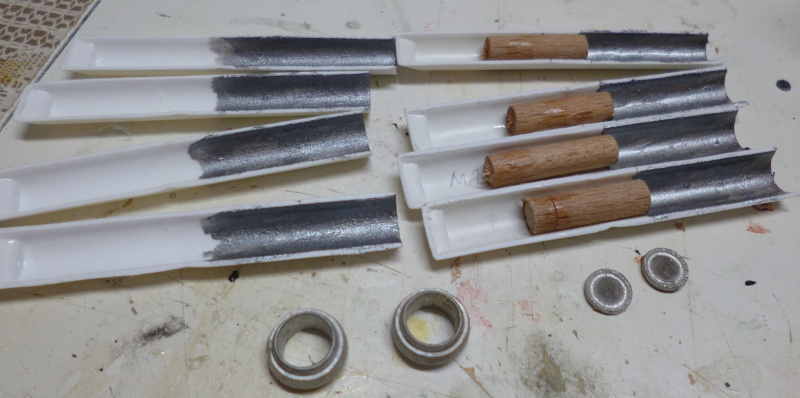
I decided I needed some help fixing the cones inside the jetpipes, so I cut some pieces of beech dowel
and glued them to the insides to provide a backing to attach the cones to. The dowels are significantly
smaller in diameter than the insides of the pipes, so they won't get in the way when joining the halves,
and they'll be completely hidden behind the cones. I intend to leave the cones the truest possible bare
metal finish, so painting the insides of the pipes had to be done before installation - I don't want fake
metal on the real metal.
2015-04-24
All wing parts have now been sanded out. The undamaged halves show much better fit (whether because I'm
learning, or because of the absense of damage and patches is unclear), and even pairs of one of each show
acceptable fit. I expect to be able to assemble the wings over the weekend.
2015-04-25
I did a comparison between the various wing halves, and it's clear the repaired parts are bent. The outer
panels of the upper half have lost dihedral, while their lower counterparts have picked up some extra.
The funny thing is, when I dump the undamaged parts into the mould I used for the patch, it wants to bend
the parts into the opposite direction (ie, would help correct the problem), so I don't think that part of
the patch process caused the problem. The strips of CA drenched paper on the insides of the patched wings
might have something to do with it though; if these shrunk while setting, they would force precisely this
change in shape.
On the brighter side, it looks as if glueing the outer panels first, followed by the centre section once
the glue has set, should fix the problem, even when I don't mix the pairs.
I think I'll be able to construct the innards before opening up the front engine faces. If that turns out
to be true, I'll leave the faces on to help maintain shape until after the wings have been completely
assembled, and cut them out just before fitting the resin intakes.
2015-04-26
I've started work on the assembly of the wings, and have found that great big blob of rubber I used to repair the wings to be quite useful during alignment and assembly as well. It's heavy, has lots of friction, and is unaffected by most chemicals, in other words, it's a great third hand. It's seen here in action holding the wing steady while I mess around with the three parts that are the basis for the engine assembly.
The pipe and nozzle are not attached to each other in any way at this stage, and held together and aligned by a rolled up piece of paper, which, by virtue of wanting to unroll, grabs both parts tightly enough to hold them together. My intention is the fix the pipe and face assemblies in place before closing up the wing, and only add the nozzle once the wing is otherwise finished (I don't want it in harm's way while I beat the wing into submission with what will probably be several iterations of filler and sanding), so they'll remain separate for quite some time yet.
Since the attachment of the jet pipe to the engine face is rather critical to overall alignment, and will most likely take some fitting before the wing halves can close around it, I'm not taking changes with fragile bonds. Once again the mould is helping out, this time by holding the pipe and face assembly upright while I pour resin into the trough, hopefully resulting in a really stable bond between the parts.
2015-04-26
Looks like I was overly pessimistic here; the wings will close just nicely with the faceplate in place. The first pipe and plate assembly is mounted in place in the salvaged wing. I added locator tabs to the end of the pipe, which I'll leave loose pending joining to the nozzles much later. Three more to go.

2015-04-26
And then there were wings...
I'll be spending quite a bit of time next with filler and sandpaper to tidy these two up, especially the repaired one, before opening the intakes and completing the interior.
Fit of the undamaged wing was much better than I'd ever dared hope for; apart from the absense of locator tabs, assembly was as problem free as on any modern injection kit (and better than some injection kits I've dealt with). My compliments to whoever made that mould.
2015-04-27
I just started cleaning up the undamaged wing. The join between the two halves was easily dealt with, but the number of sucker/ejector marks is driving me bonkers, especially since the sucker marks tend to sit right in a panel line. I understand that's where they're needed the most, but really..
Anyway, the initial pass is complete, and before I go any further on this, I'll give the wing a good scrub down and a coat of primer to see what I'm doing.
The repaired wing has some serious damage to fix in this stage, which means larger amounts of filler, which means it will take longer to cure, so I don't think I'll be doing any sanding on that before tomorrow. Fortunately, the remaining damage borders on resin, so I can use the hotter solvent based fillers there. Nothing wrong with acrylic gel, but in large quantities it takes even longer to cure, and it does show a bit of shrink, meaning several passes are needed, and that takes time.
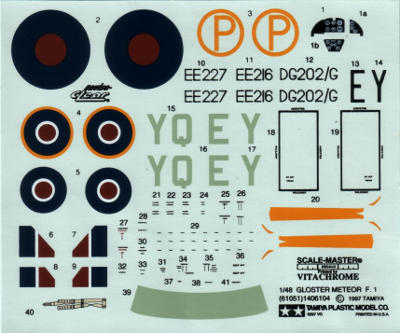
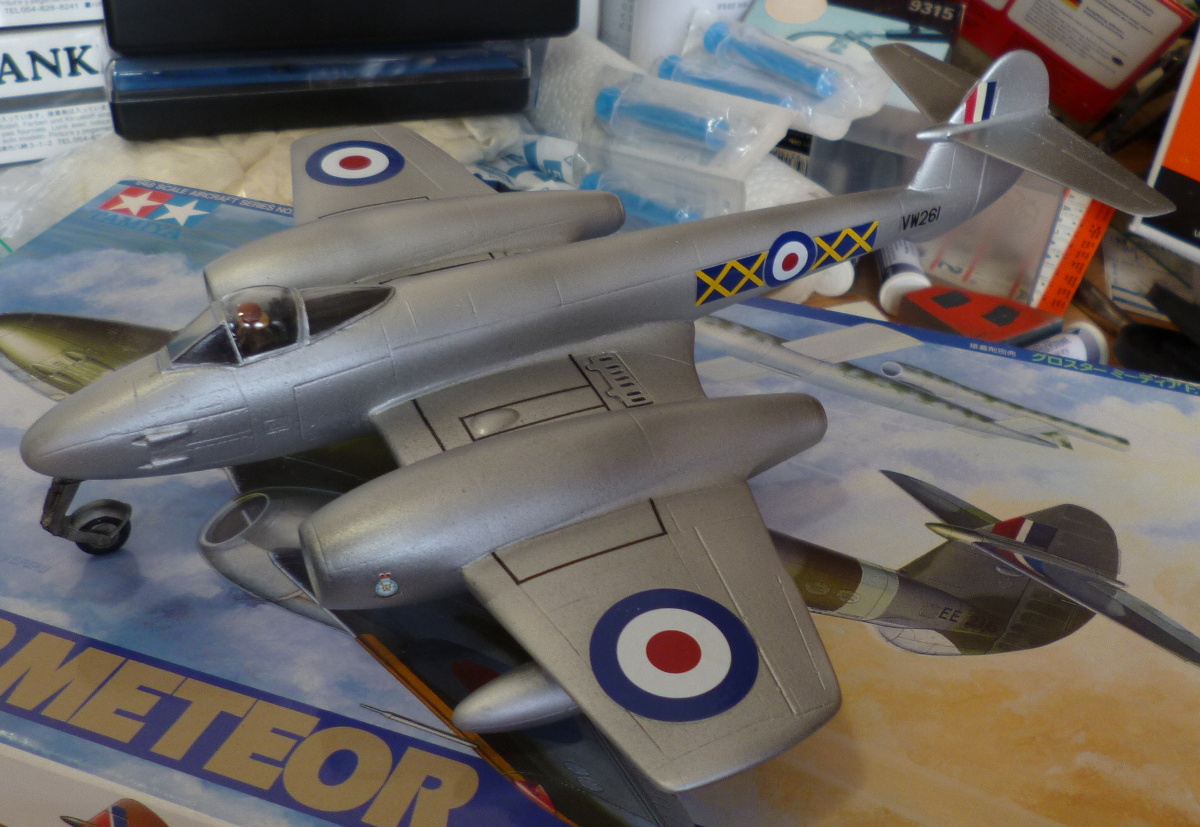
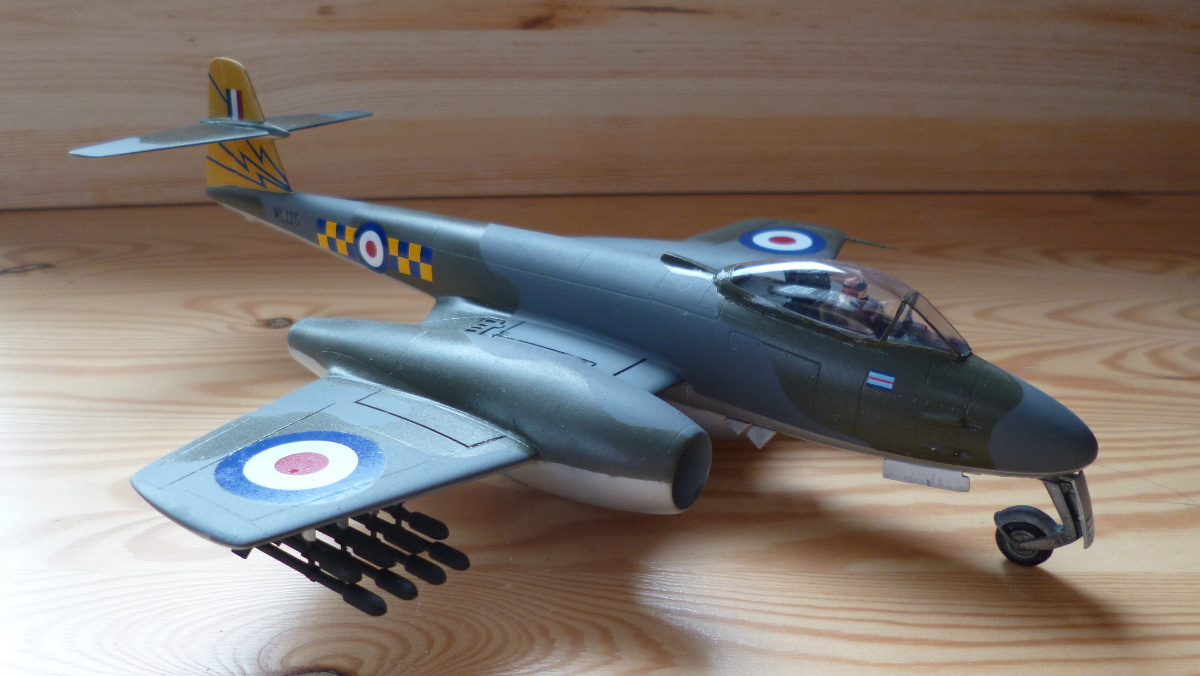
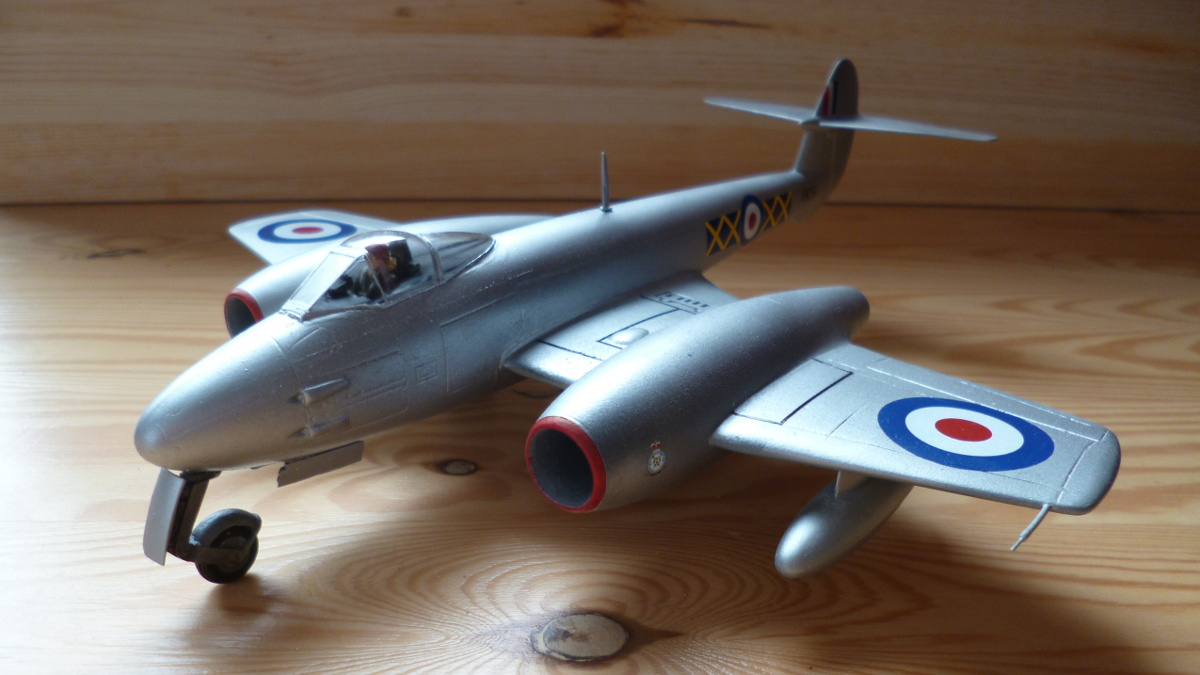
In any case, it's time to start looking and thinking beyond the wings. I bought two sheets of decals a while back, but an extra sheet with roundels turned out to be necessary. This is now on order. The plan as it stands now is that the Mk4 will become an overall silver plane from 609 Squadron RAuxAF, with a pair of underwing tanks, while the Mk8 will become the personal mount of the CO of 245 Squadron RAF, in grey-green camo with a belly tank and underwing rockets.
Given that silver finishes are really sensitive to surface problems, this may mean I'll be swapping the damaged wing over to the Mk8, and use the camo to hide some issues. Time will tell.
2015-04-27
Good thing the Tamiya kit is engineered for modular building. I just revisited the cockpit area of the vacforms, and I'm beginning to fear I may end up effectively rebuilding it from scratch :cry: I'll need my injection cheat sheet visible for a while yet..
2015-05-01
Just some non picture worthy cutting and sanding today.
I opened up the first of the engine faces on the undamaged wing, and got as close as feasable to fitting the resin intake part. There will still be a gap in some places in need of filling, but any further fitting/filing will probably knock things out of alignment, which is worse. The instructions state that the intakes are handed, but this is not strictly true; they have different inboard and outboard sides, but the shape of the two is identical, and they only need to be rotated into the correct position. This would be irrelevant when just building the model, but I'll have to make copies of the intakes, which makes it rather relevant whether I need to make two different moulds, or if one will suffice.
I also sanded the seams and patches on the damaged wing smooth. The patchwork will take another iteration of filler and sanding before complete, but this is no surprise. I have high hopes that once painted, nobody will be able to tell the difference between the two wings.
Not sure if that makes me entirely happy though...all that work, and nobody will ever notice:-)
2015-05-08
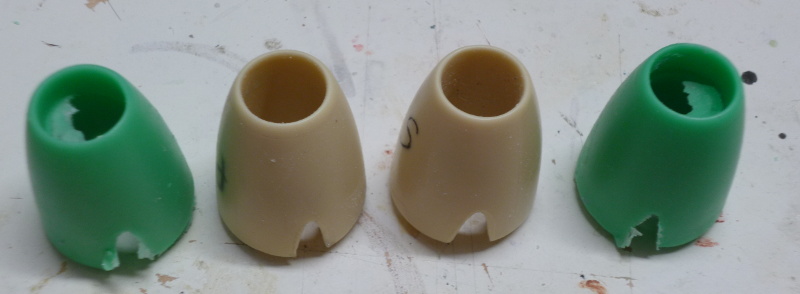
I've just cast the second half of the mould that should supply me with a new pair of intakes. For something that is little more than a tapered cylinder with a hole down the middle, this is a surprisingly tricky thing to make a mould for, due to the need to keep things lined up, the hole where it belongs, the pouring block out of sight, and the resulting cast removable from the mould. We'll see either tomorrow or Sunday whether I've been succesful in this..
2015-05-10
Finally, some real activity again..
I opened up the second engine intake on the undamaged wing, and filed various bits down to what I believe is the best fit I'm going to get; the splitter plates now line up fairly well with the notches in the intake parts, although this leaves a gap between the intakes and the vacformed nacelle parts. I'll mount them like this, and make up the difference with filler. I think this will produce a better result than cutting down the splitters, or deepening the notches.
The shape of the intake splitter on the left was completely different from the one on the right. Since the left one matched the intakes best, I filed the right one down to match.
The mould for the replacement intakes is something of an oddity. The dark blue insert was made first, by embedding the entire intake in plasticene, with the hollow partially filled, and gaps dug out of the clay to form the "wings". Once set, all clay was removed, and the combination placed on a flat surface with the rubber plug at the bottom. The much larger purplish block was then poured on as usual after building a Lego box around the lot
The purple rubber is very soft (and thus easily damaged) and never gives up completely on being sticky. In other words, it's a nuissance to work with, and won't last long, but because it is so soft, it's easy to get the resulting casts out. When pouring the resin (through the gap left between the plug and the side of the cavity in the block), the plug tries to float on top of the resin, so I have to keep it down by parking another mould on top of it.
I think I like my new green intakes
I'll leave them to cure until sometime tomorrow, and then start fitting them to the wing, which, apart from a few very minor bits, has now been cleaned up completely. It's turned out what I would call "bug compatible", that is, identical right down to the errors in the original, of which, sadly, there are a few; the aforementioned difference in shape between the splitters, and the fact that he rear end on one of the nacelles is shorter on the top half then on the bottom half of the wing (and of course, the longer one is correct, so more filling will be needed here).
2015-05-11
I've started work on the mould that should produce the replacement undercarriage doors. I have one complete set, plus the nose wheel doors for the second, but the Aeroclub ones are either bulky and UGLY (in case of the main gears), or beautifully cast in metal, but still too bulky (nose wheel). I'll therefore be making use of the Tamiya kit as donor for the masters.
This will be a "simple" open mould. I've attached all the Tamiya doors to a single 'rail', which will become the pouring block for the lot. There's no way I'll be able to wiggle the parts out ot the soon-to-be-poured block of rubber, so I'll be making cuts in the resulting block to turn it into a sort of fan, with each part sandwiched between two blades of the fan. Effectively, this will create a connected series of two part moulds, of which the halves remain connected at the bottom.
Or so I hope....
The new intakes looked really rough around the edge that joins up with the wings, but took surprisingly little work to clean up. Dry fitting shows they are now as good as the originals.
The insides will take some further work though. The parts of the mould on the inside of the intakes did not line up properly, and one of them is going to need some serious sanding/filler/sanding to look smooth. I've got it down to the point where it's unlikely to be noticed, but I'm not yet happy with it, and I think I can afford a little more work on these chaps.

2015-05-13
OK, that wasn't my most brilliant move. I have to bend and generally wiggle the mould about to get resin into the actual doors, and with each cavity getting in the way of work on the others, this isn't exactly great. Still, I should be able to get a sufficient numbers of workable, if hardly perfect, doors out of the mould, over several castings.
2015-05-13
Today marked a change for this project: I have shifted focus from creating the parts to actually building the planes. You'd never know the difference, but to me, this is significant.
I dryfitted the new intakes to the repaired wing, and made a start on the innards of the engine nacelles. The insides have been painted aluminium, and I'm nothing short of delighted by the effect of a simple black wash over unpainted white metal
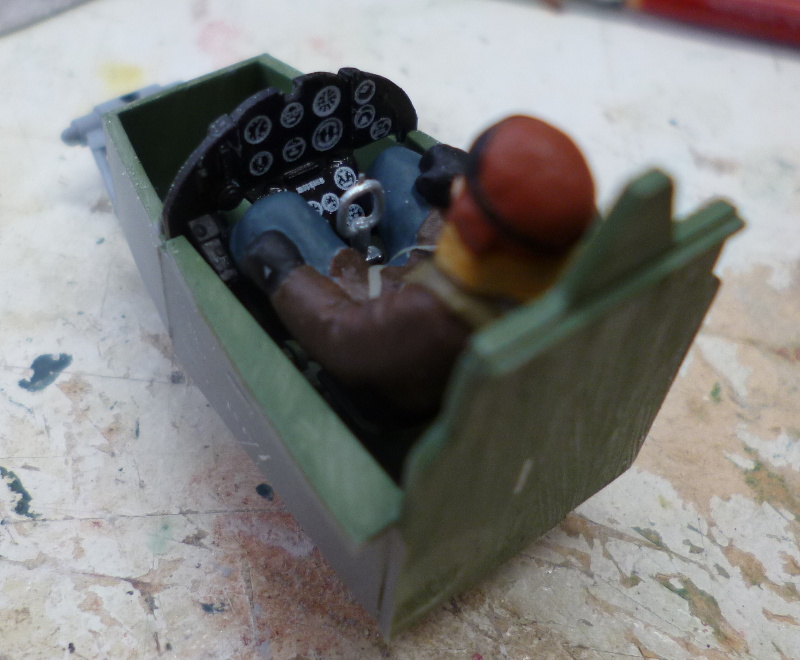
Work of the wings will continue, but primary focus will shift to the fuselages, and particular the cockpit tubs for a bit. I think I might be in for a bit of fight with the tubs; dry fitting doesn't really look good, and squeezing the modules into the hull was problematic on the Mk8. We'll see. In any case, this is going to require the use the crew, to make sure the pilots are between 'head through the canopy' and 'lost in the depths'. Perhaps foolishly, I assembled and painted them up.
The chap on the left will fly the Tamiya Mk1 prototype being built in parallel with the vacforms, the one in the middle will go in the Mk4, and the leftmost figure is destined for the Mk8.

2015-05-14
I just installed the engine faces into the nacelles. Dry fitting suggests they'll be nicely visible once the intakes are installed, but I have my doubts as to my ability to take a decent picture at that point, so I'll put up this one for now.
2015-05-17
Sometime you just get lucky..
The paint on the instrument panels (rattlecan over bare metal) didn't exactly do a sterling job covering the metal, but it saves me from drybrushing to pick out the details
The cockpit module for the Mk4 is complete. I had to mutilate the poor pilot to fit beneath the IP, but sadly, that's normal in this line of work.
These kits come with gun ports moulded into the fuselage sides, but for the more ambitious builder, there are also metal replacements. These are quite a bit sharper defined that the plasitc ones, so I tried to install a set on the Mk4. If anyone here is considering the same, DON'T. Filing off the bulges in the fuselage sides leaves an almost-hole in their place, and the metal parts look totally wrong when in place. To really make them work, you'd have to embed them into the plastic sides, so that the front of the port lines up with the indent directly in front of the bulge (the fronts of the metal parts are full circles. The parts appear to be intended to be glued onto the sides, but that would have required semi circles).
This just won't work. I'll be giving August's trick with plasticine moulds for resin a shot, and try to copy the plastic bulges from the F8. I just hope my clay is up to the task.
2015-05-18
The newly cast gunports seem to be OK. They're on the fuselage, and should blend right in with a bit of sanding later on.
I've completed the cockpit module for the F8.
At that point, things suddenly sped up. With the cockpits complete, I could close the fuselages around them, and the wings are all but ready for joining as well.
I hope to make a start on the last mould needed for this project later today: the rocket armament for the F8. No reconstruction, in this case, merely multiplication of the 8 rockets in four pairs
2015-05-19
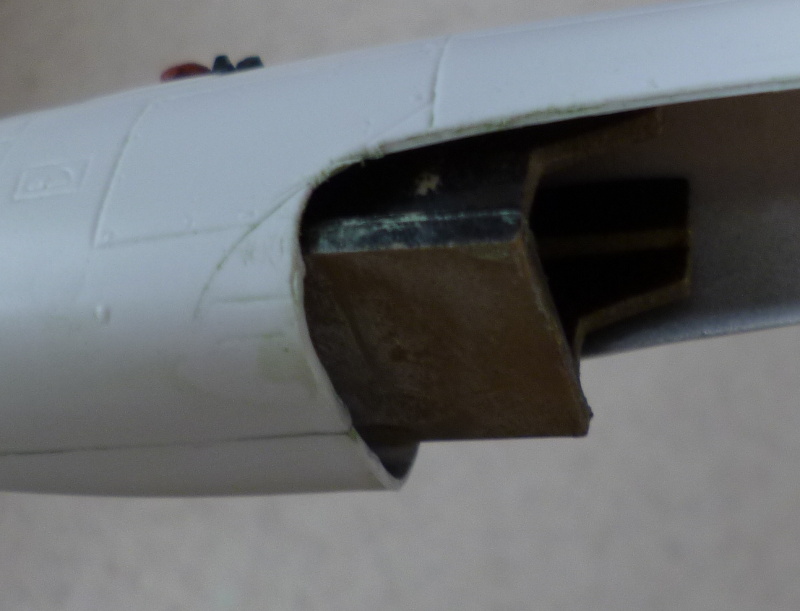
I just took a first peek at fitting the wings to the fuselages, and I'm afraid this is going to involve serious violence. The cockpit modules are too long, and extend into the space where the wing is supposed to go.
The picture is of the Mk4 fuselage, the worst of the two. I'm not even sure the module was intended for a Mk4; I've had my suspicions that at some time there was a third meteor in this batch which I never saw (extra or unidentifiable parts), and it may well be that the cockpit module I put into the Mk4 was intended for an F8 or a twoseater. In any case, all that plastic visible inside the wing cavity will have to go. Buckets of dust expected for tomorrow
2015-05-20
A dremel with a grinding disc supplied the violence predicted. Since powertools are powerful, and plastic wimpy, the amount of (visible) dust was very limited, as opposed to the number of half molten blobs of plastic peeling off the cockpit modules :twisted: The vibrations from the grinding knocked the front wheel loose from it's actuator rod on the Mk4, but that can be fixed.
The excess plastic now out of the way, is was fairly simple work to get the fuselages and wings to line up. That is, line up to the extent that this is possible, because the wing parts (both of them, this is not a result of the restauration work) are too wide on the port side, and stick out more than the thickness of the plastic.
The fuselage bottom that is part of the wing is asymmetrical, and the more slender right side is correct.
I'll have to put something inside the wings before mounting and grinding into shape with tons of elbow grease and sandpaper, to prevent creating a gaping big hole where I've gone completely through the plastic. Since I can't wait for several hours for milliput to cure, I'll go out to get some 5 minute epoxy putty. Nasty stuff, but fast, and even stickier than milliput, so precisely what's called for at this time.
2015-05-20
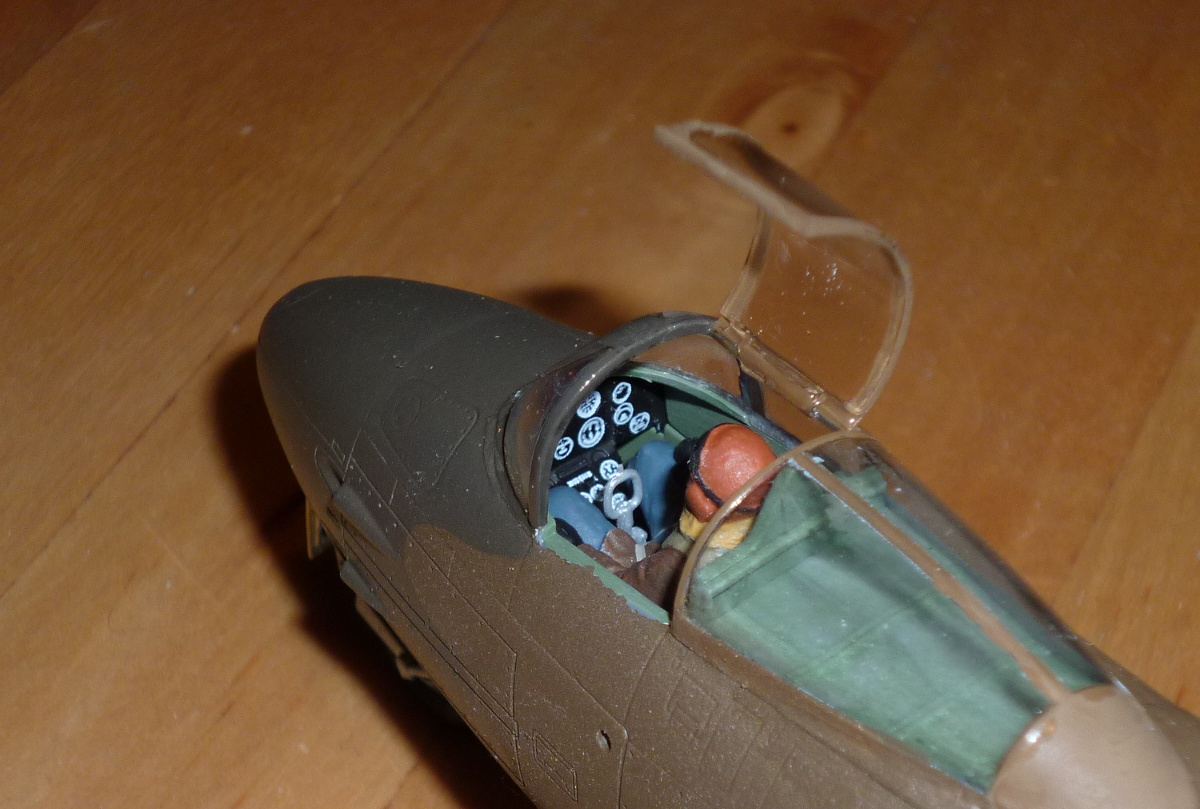
Time for my first encounters with vacform canopies. 'Scary' isn't even close...
The F8 canopy, as near as I can determine, is the original part. If you look closely, you can find the demarkation between frame and canopy, but that's as far as detail goes. Aeroclub thought is was a good idea to include a metal front canopy frame, and an insert for the rear half that is part of the canopy slide opening mechanism. Of course, fit is only so-so. The canopy had been cut out by the previous owner, and I won't even think of trying to improve on that; I'll have enough 'entertainment' joining it to the frames and fuselage.
Clearfix is great stuff, but slow. Holding this miniscule frame in position against wobbly canopy did not seen like a recipe for success, so I taped off the canopy and plunged it into a block of plasticine to hold it in place, squeezed the sides slightly to make the canopy narrower and match the frame (which in turn had been matched to the fuselage sides), and added a few blobs of clay for the frame to rest against. Slopped on some Clearfix, joined things up, and now waiting for the Clearfix to set. I'm not touching this thing before tomorrow. Hopefully, things will come out correctly aligned, but I wish I could be more optimistic about it.
I thought I was goint to get of easy with the Mk4 canopy, but no such luck.
The Mk1 canopy I was planning to steal from the Tamiya didn't fit the fuselage, and worse, is a completely different shape than the Mk3 Squadron canopy I bought earlier. The Squadron part also seems to match the outlines on the fuselage rather well, so I'm betting this is the correct shape. It's still a vacform canopy though, and since I bought this one new, there was no longer any escape from cutting out one of those.
Let's just say that after the fact, I'm forced to conclude that I'm neither good at nor fond of the process :cry: I might be able to fudge the rather clumsy cut between the middle and rear part into somthing acceptable, but for now the brilliance of vacform canopies is beyond me.
2015-05-21
I'd painted up the rear canopy insert for the F8 with Vallejo acrylics yesterday. Just now, I tried to glue it into place with Clearfix. Ugly black smudges all over the transparency, as the Clearfix reactivated the paint. A quick wipe with an alcohol soaked cotton swab got rid of the paint, but was hot enough to reactivate the 'protective' coat of Future (which had already betrayed me earlier on by not drying up completely clear, but with ugly specks in it suggesting bad need of window cleaning) resulting in matted areas. I'd since chucked the problematic bottle of Future as unsuitable for modelling work, so my only chance was Humbrol Clear. The resulting horrid mixture seems to be drying up as a very dirty windscreen. Even if I manage to salvage the canopy, it will set me back days, which I don't have. This may well result in a DNF for the F8.
In any case, I'm through with this ecomaniac junk, and going back to dirty old effective enamels; enough acrylic misery for this year.
2015-05-21
The mess was as bad as expected. Cleanup, fortunately, seems to be less of a hassle than feared; leaving the canopy sitting in a cup of 96% alchol completely wipes it back to bare plastic. The F8 part is now drying, and will get a new coat of Humbrol Clear later today, and the frame will be glued in place this evening. Effective loss of a day, which I can probably schedule around.
Getting ambitious about cleaning, I've now dunked the Mk4 canopy in the same cup of alcohol; I was willing to put up with the less then perfect result of the Future to avoid the risks inherent in cleaning and starting over, but with the cleaning process tested on the F8 I'm no longer willing to put up with any nonsense there.
Both fuselages have been joined to their wing, and the seam blobbed over with filler. Tomorrow, the dust will fly as I clean off the excess filler and sand the lower fuselage join into shape.
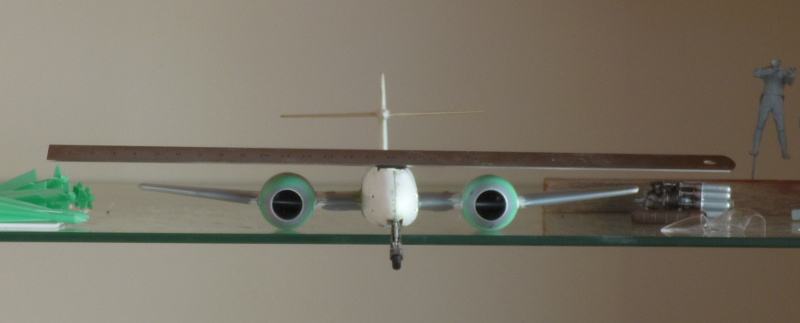
2015-05-22
Alerted to the issue by Splash's build, I decided to check the alingment of the wings and fuselages. The Mk4 was ok, the F8 was skewed in every way possible. Not only was the wing-fuselage join messed up, the whole fuselage has torqued, as seen in the top picture. Annoyingly, the torque is counter clockwise seen from the front, while the join is skewed clockwise. That means the skewed tail will be even more pronounced when I straigthen out the join.
I've cut loose the port side of the wing-fuselage join, and pushed in some plastic wedges I made from Evergreen strips. These corrected the fuselage to wing alignment sufficiently.
I'm still trying to figure out how to get the torque out of the fuselage; with that huge tail it stands out like a sore thumb. Fortunately, I have time to think while the wedges recover from the glue I hit them with.
Clearly, the F8 is not the luckiest plane out there

2015-05-22
More cutting and wedging fixed the F8 tail. Pfew..
While the F8 recovers from a flood of chemicals, I've been working on the Mk4 wing join. This was much cleaner than the one on the F8 (I'm going to clain superior plastic chopping skills compared to the original owner :-D ), but still had the nasty shape problem at the front of the wingroot.
The entire area has become such a mess of colours and structures that it's becoming hard to see whats going on. To improve matters, I'll shoot a coat of primer over it all as soon as the model has dried from it's bath, just to get a good look of where things stand.
2015-05-22
I swear this thing hates me.
I'd been wondering what that big thing was that was bouncing around inside the F8. Now I know. It's the expoxy plug that was supposed to sit behind the overly wide wingroot. It's not doing it's job, I'm sorry to say, which I discovered when I sanded right through the plastic and found a gap, rather than a plug behind it. Let me assure you some very uncharitable thoughts occurred around this time...
Still, the show must go on, and that requires a wingroot. I cut away the parts most likely to vanish in further sanding, and stuffed a wad of tissuepaper through the hole, holding on to part of it with a pair of tweezers. I then rather unceremoniously dribbled CA all over it. Hopefully, this will stick the paper to the edges, and at the same time harden the soaked paper to the point where I can sand any bits sticking out smooth, and use it as a base to throw more filler at.

2015-05-24
I'm going to call the F8 ready for the paintshop.
I used the canopy insert at the back to attach the whole thing to the fuselage, then closed any gaps with Clearfix. Once set, the clearfix was painted black (to avoid visible while rims on the inside), and once that was dry, I squirted a big fat blobby line of Vallejo filler along the edge. This was then wiped smooth with a wet finger (followed by more wiping to clean it off the canopy; with this material, you can get clean away with that). This filler doesn't sand all that well, but nothing beats it for a quick, smooth line in dangerous places, like around transparencies.
The Mk4 has some work to go before it reaches this stage, but since it will be overall High Speed Silver, it will need much less time in the paintshop than the camo F8, so I'm not worried.
2015-05-24
The Mk4 is coming along nicely too. One, maybe two more filling/sanding iterations, and I ought to have the wing-fuselage join cleaned up and smoothed out. The fit may have been better on this kit than on the F8, but the F8 has the large slipper tank under the fuselage hiding most of the issues.
2015-05-25
The Mk4 is also ready to go to the paintshop. We're getting there...
The F8 has been primed, and the first two colours (yellow for the tail, and black for the walkways) are on. I hope to do the remaining three at a rate of one per day from here on; any faster is risky, as masking will be involved and paints need time to cure. Without the GB deadline I would probably wait several days between two colours, but it will probably be fine.
2015-05-26
High Speed Silver just went onto the bottom of the F8. It also went damn near all over my workbench; when I cranked open the tin, the lid made a credible attempt at exploding off with a respectable bang :omg. Needless to say I jumped and tipped the tin.
Fortunately, this is again fairly thick paint, and I managed to salvage most of the spill and send it out the airbrush. Agression aside, it's good paint to work with. Good thing too, since I got it into my masochistic mind to do the Mk4 with the repaired wings in overall silver, which is asking for trouble of course.
Never a dull moment with XtraColour...
I did a headcount of workable castings of the undercarriage doors, and I should be all set on that front. Cleanup and patchwork this afternoon. That leaves just the rockets to produce.
2015-05-26
The Mk4 had a few spots that just wouldn't become smooth, so the doors had to wait. I finally got the Mk4 primed and painted black on the top (just the center section of the wings would have been enough, but I had too much paint..). The F8 has has a coat of varnish shot over the silver, in hopes of improving decal adhesion later on.
2015-05-27
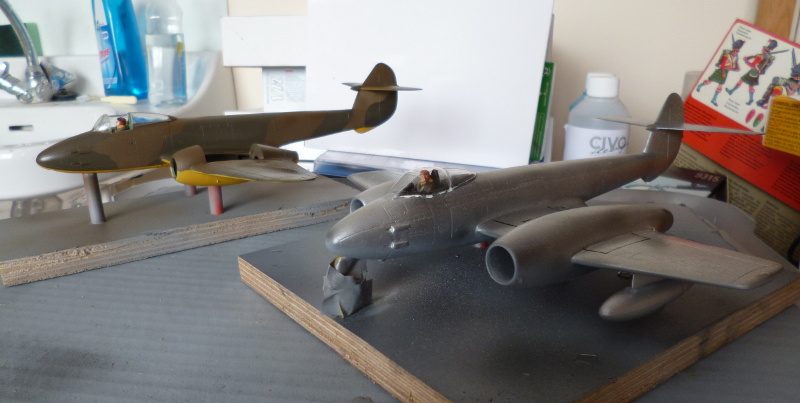
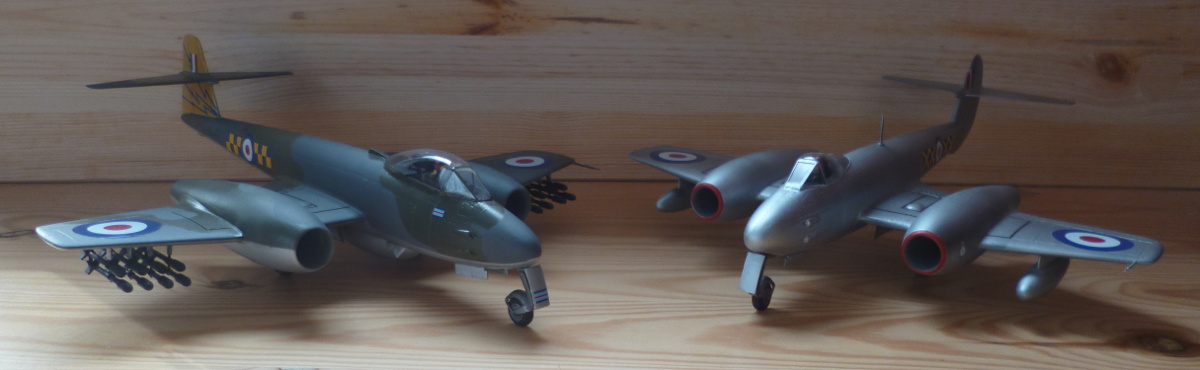
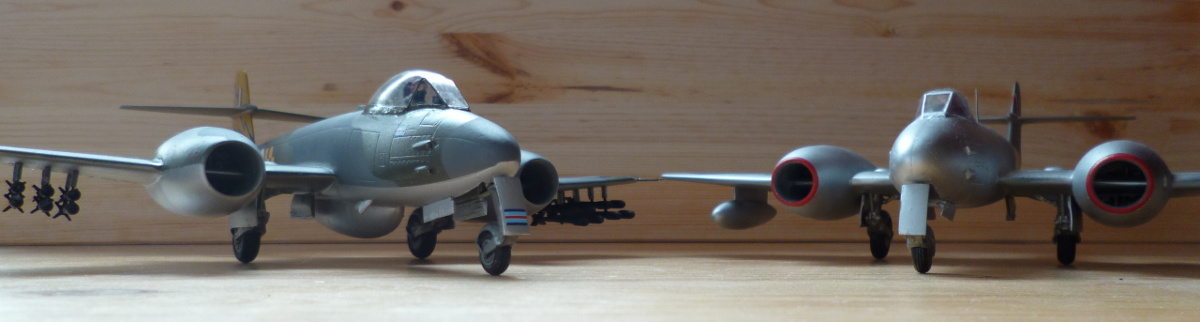
The two early marks are back from the paintshop. In general, I'm happy with them. In general..
The silver on the top surfaces somehow picked up somthing nasty from the surrounding air, and turned all rough in some spots. This wasn't the surface of the model; there may have been some issues there, but nothing like this. It was actually rough to the touch. So, with great trepidation, I went after it with some sandpaper. Well, sandpaper.. 2000 grit feels smooth to my fingers, nothing sandy about it. I managed to clean most of the roughness off, with no damage to the undelying paint.
Sadly, I managed to miss a few bits around the nose. Due to the grey primer this didn't show up until too late. I'll have to find some way to fix this. I'm thinking a bit of drybrushing might do it.
Time for what should hopefully be my last trick for this project: the undercarriage doors.
The rather unsuccessful mould I made to duplicate the doors from the Tamiya kit routinely leaves out part of the edges of the doors, with corners being among it's favourites. Trying to get a blob of normal filler to stick to a corner, and then not break off or crumble while being filed into shape, has so far been beyond me, so I needed an alternative approach. The idea is this: first, reconstruct the outline with some copper wire. Then, if the gap is large enough, put on a drop of Clearfix, as though creating a small window. Once this is set, apply normal filler over the thin but rigid edge/sheet to build up the thickness needed, and file into shape. Theoretically, the support from the wire and optionally Clearfix should give the filler enough to hang on to.
I used a small cut off from an electical cable (essentially a bundle of this parallel wires) to supply the copper, and if needed bent it into the correct shape to cover the corner. The wire was then stuck to the resin with a drop of thin CA.
We'll see if at works shortly.
2015-05-28
Drybrushing worked nicely along the nose, but I also had to use this up to some extent to blend in the touch-up around the canopy, and there it created a visible collar around the cockpit, with clearly isn't supposed to be there. I saw no other option that to re-mask the canopy, and run a fine airbrush with more silver over the affected area. While I was at it, I also patched some other minor issues I would normally have left alone, but since I was masking and spraying any way, I thought I might as well.
The F8 has also had it's paint job completed, save touch up.
I'd masked the cockpit with maskol, hoping to need less force to pull it of the canopy than tape, since I'm not completely happy with the bond I'm getting between vacform canopies and plastic. This was a mistake; not only did I need at least as much force as using tape, but the maskol dragged out from between the canopy and the paint, rather than taking the paint with it, giving an ugly jagged edge that will need work. The walkways will also need damage control, since the masking tape tore some of the paint off with it. Oh well...
I now have six pairs of resin rockets. I'll use originals for the final two, keeping two for use as masters just in case, That means that, four days before the deadline, I've finally reached the end of parts production. Good thing too; it's been fun, but the next project is a yet to be determined shake-and-bake kit
2015-05-28
More SNAFUs...
The undercarriage legs start out identical, and the builder is required to file off the socket for the actuator on one side only (different sides on each leg of course). Now problem. Thing is, I've got two half documented kits. I thought I started out with four identical legs, cheerfully chopped off the appropriate sockets, and installed the (two different sets of) wheels in the legs. Still cheerful, I glued the set with the Mk4 wheels in the bays. Fit seemed beautifully tight, but just in case, I checked wheel alignment.
One leg clearly was several mm taller than the other. A quick, if belated, inspection showed the legs were not identical, so I yanked out the taller legs before the CA was fully set. Taking stock, I found that I'd chopped off the left sockets on both the Mk4 legs, and the right sockets from the F8 legs (or the other way around, no idea which is which). Filed off bits don't grow back, so there was no way to swap things around. The only solution was to shorten the longer legs. Not exactly trivial, but I found a place where I could cut through a moulded in actuator, and then bend the leg so the ends of the actuator line up again, effectively shortening the actuator and the leg. Good thing these are metal legs; it takes some more effort to saw through them, but at least they can be bent without breaking.
2015-05-28
I just stuck the decals on the Mk4. Getting sort 'o cheerful about this one
After I've hammered the decals flat with solvents, all that remains are the wheel doors, antenna, and pitot. Barring disasters this will finish on time
2015-05-29
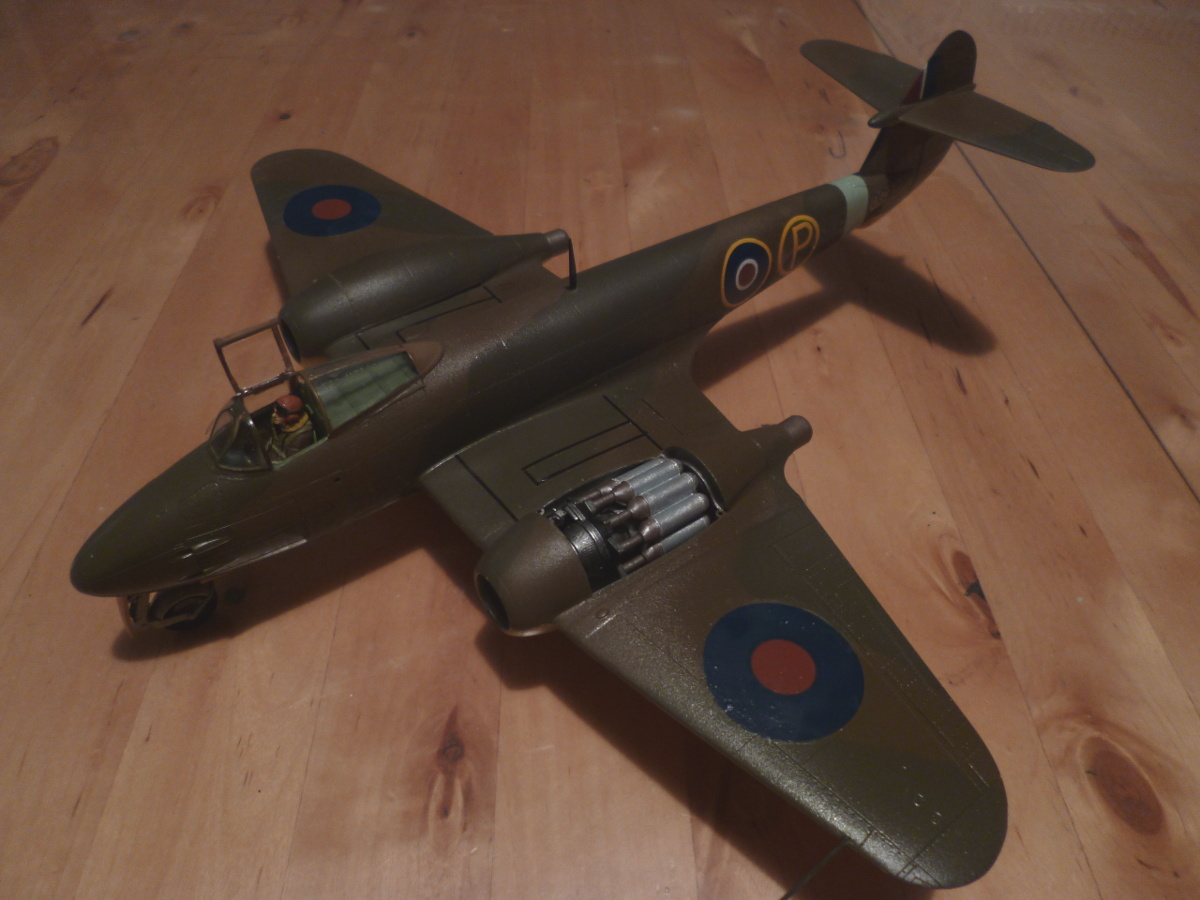
I couldn't resist a little embellishment for the Mk4...
The instructions from the decal sheet show narrow red bands along the engine intake, but no decals for that of course. Free hand painting didn't seem like all that bright an idea (better to leave them off than to put them on badly). But I wanted those rings, if only for a little extra colour..
Free hand was out, so was airbrushing (couldn't properly mask that either). I needed some sort of line to work with. So I made up a little toy: an old scalpel blade, mounted just above a strip of plastic. I then pressed the left end of the plastic strip against the front of the intake, and rotated almost full circle (fuselage was in the way); some scuff marks can be seen on the plastic. This gave me just enough of scratched line to paint the rims by hand.
2015-05-31
I finally found the time to assemble and fix the rockets for the F8. The glue is now setting on the lot of them. Next will be painting and installation, installation of undercarriage doors, and a big "phew, I made it".
Fiddling with the rockets finally introduced me to the experience of glueing your fingers together with CA. Did I earn a button?

|
|
|
|
|
|
|
|
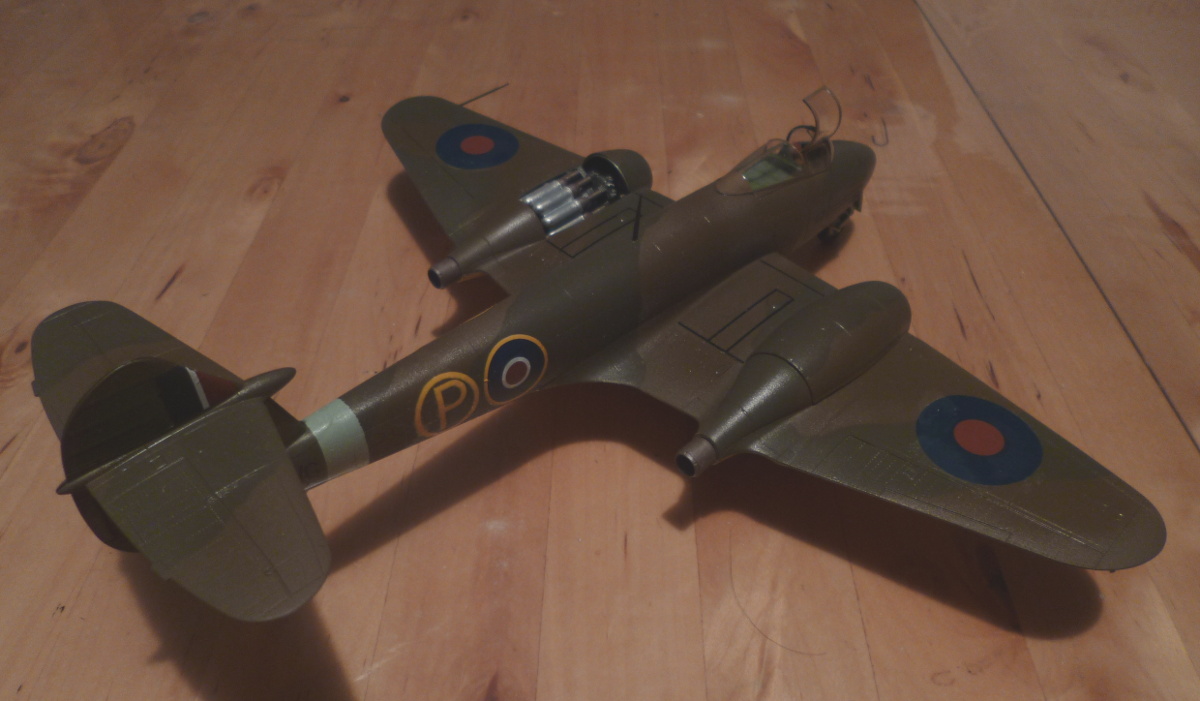
2015-06-08
So there I was at the local IPMS meeting, feeling really smug about my meteors. Then someone
who, unlike me, knows a bit about meteors, points out the tailplanes on the Mk4 are wrong. I
should have copied the tailplanes from the Mk1 for this rather than those from the the F8. I didn't check,
but this makes perfect sense in view of the redesigned tail on the F8, and the original tail
on the Mk4. But know what? I refuse to be any less smug about these two:-)
Finishing materials Mk4:
Motip primer overallX38 RAF high speed silver overall
Humbrol gloss Clear overall
Microsol
Finishing materials F8:
Motip primer overallX11 RAF trainer yellow tail
X38 RAF high speed silver bottom
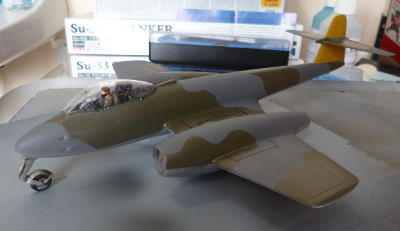
Hu164 medium sea grey top
X1 RAF dark green camo
Microsol